


MeetMeWorld MeetMeWorld MeetMeWorld Networking for the rest of us
  • Home
  • News
    • Fact Check
    • US News
      • US News Articles
    • World News
      • World News Articles
  • Business
    • News and Advice
      • News and Advice Articles
    • Small Business
      • Small Business Articles
    • Subscriber Business Articles
  • Sports
    • News and Analyses
      • Sports News and Analyses Articles
      • Motor Sports Aticles
    • Baseball
      • Baseball Articles
    • Basketball
      • Basketball Articles
    • Football
      • Football Articles
    • Golf
      • Golf Articles
    • Hockey
      • Hockey Articles
    • Soccer
      • Soccer Articles
    • Tennis
      • Tennis Articles
  • Entertainment
    • Celebrity News
      • Celebrity News Articles
    • Humor and Comedy
      • Humor and Comedy Articles
    • Movie News and Reviews
      • Movie News and Reviews Articles
    • Music News
      • Music News Articles
    • Theater News and Reviews
      • Theater News and Reviews Articles
    • TV News and Reviews
      • TV News and Reviews Articles
  • Hobbies and Interests
    • Antiques
      • Antiques Articles
    • Cars and Motorcycles
      • Cars and Motorcycles Articles
    • Cats and Dogs
      • Cats and Dogs Articles
    • Collectors
      • Collectors Articles
    • Cooking and Baking
      • Main Dish Articles
      • Side Dish Articles
      • Baked Goods Articles
      • Dessert Articles
      • Beverage Articles
      • Appetizer Articles
      • Sauce and Condiment Articles
      • Breakfast Dish Articles
    • Gardening and Landscaping
      • Gardening Articles
    • Needles and Thread
      • Needlepoint Articles
      • Sewing Articles
    • Needles and Yarn
      • Crochet Articles
      • Knitting Articles
      • Plastic Canvas Articles
    • Other Hobbies and Interests
      • Other Hobbies and Interests Articles
  • Crazy Games
    • About
      • Crazy Games Articles
    • Arcade Games
      • Crazy Roll 3D
      • Pinball Arcade
      • Shape Shooter
    • Card Games
      • Classic Solitaire
      • Cribbage
      • Tri Peaks Social
    • Pool Games
      • 8 Ball Billiards
    • Puzzle Games
      • Cups
      • Pipes
      • Blocks
      • Block Buster
      • City Blocks
      • Diamond Dungeon Match
      • Mystery Forest Match
    • Racing Games
      • Super MX
      • Super Star Car
      • Super Trucks Offroad
      • 4 x 4 Offroad
    • Word Games
      • Word Search
      • Word Swipe
      • Words of Wonder
  • About Us
    • About Us
    • Contact Us
    • ChatRoom Request
    • Help Articles
    • Policies
Register for Free
  1. You are here:  
  2. Home
  3. Hobbies and Interests
  4. Collectors
  5. Collectors Articles
  6. Subscriber Articles
  7. Hobbies and Interests Articles
  8. Dessert Articles

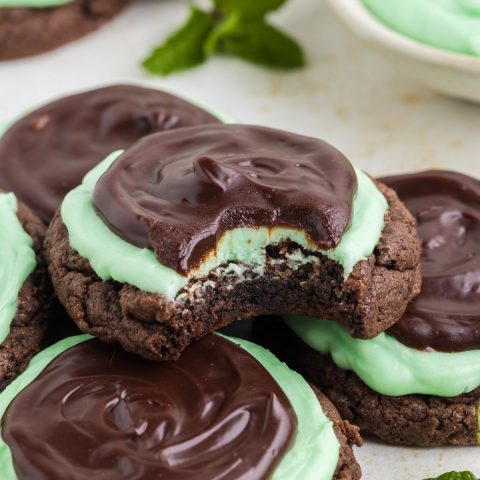
Grasshopper Cake Mix Cookies Recipe
Details
Lorie Kennedy logo
Dessert Articles
Hits: 6

Share on Social Media

Grasshopper Cake Mix Cookies Recipe
Ingredients
 
Cookies
  • 1 (15.25 ounce) box of chocolate cake mix I used Duncan Hines Devil's Food Cake
  • ½ cup vegetable or canola oil
  • 2 large eggs
Buttercream
  • ½ cup unsalted butter softened
  • 2 cups powdered sugar
  • 1 teaspoon mint extract
  • ¼ teaspoon salt
  • 1-3 tablespoons heavy cream
  • green food coloring
Ganache
  • 3/4 cup semi-sweet chocolate chips
  • 1/4 cup heavy cream
Instructions
 
  • Preheat the oven to 350°F. Line two cookie sheets with parchment paper and set aside.
  • Mix cake mix, oil, and eggs in a large bowl until well combined.
  • Drop the cookie dough onto the prepared cookie sheets using a 2 tablespoons scoop, leaving at least 2 inches between each cookie.
  • Bake for 10-12 minutes or until the edges of the cookies are set. Allow the cookies to cool on the sheet for 5 minutes before transferring them to a wire rack to finish cooling.
  • Beat the butter in a large mixing bowl with an electric mixer until smooth. Add the powdered sugar, 2 tablespoons of milk, peppermint extract, salt, and 4-5 drops of food coloring and beat until smooth. Add additional milk 1 teaspoon at a time, and a few drops of food coloring until the desired consistency and color is reached.
  • Spread a layer of the green frosting over the cookies with an offset spatula or butter knife.
  • Add chocolate chips to a small microwave safe bowl. Pour 1/4 cup of heavy cream over the chocolate chips and microwave for 40 seconds. Allow the bowl to rest for 1 minute before whisking the chocolate and cream to form the ganache.
  • Set the the ganache aside to cool for 10-15 before spreading a heaped spoonful on each cookie.
  • Allow the ganache to set before serving or storing the cookies.
Notes
This recipe was tested with a 15.25-ounce box of Duncan Hines Devil’s Food Cake Mix and 1/2 cup vegetable or canola oil. If using a 13.25-ounce box of cake mix, reduce the oil to 1/3 cup.
  • If using peppermint extract instead of mint extract, use 1/2 teaspoon. Peppermint extract is stronger than mint extract.
  • Store leftovers in an airtight container for up to three days or in the refrigerator for up to five days. The ganache will stay softer at room temperature.
  • Freeze the unfrosted cookies in an airtight container for up to three months. Place a sheet of parchment paper between layers to prevent the cookies from sticking together. Thaw the cookies at room temperature before enjoying them.
BOSTON CREAM DONUTS 

Details
Lorie Kennedy logo
Dessert Articles
Hits: 1329

Share on Social Media

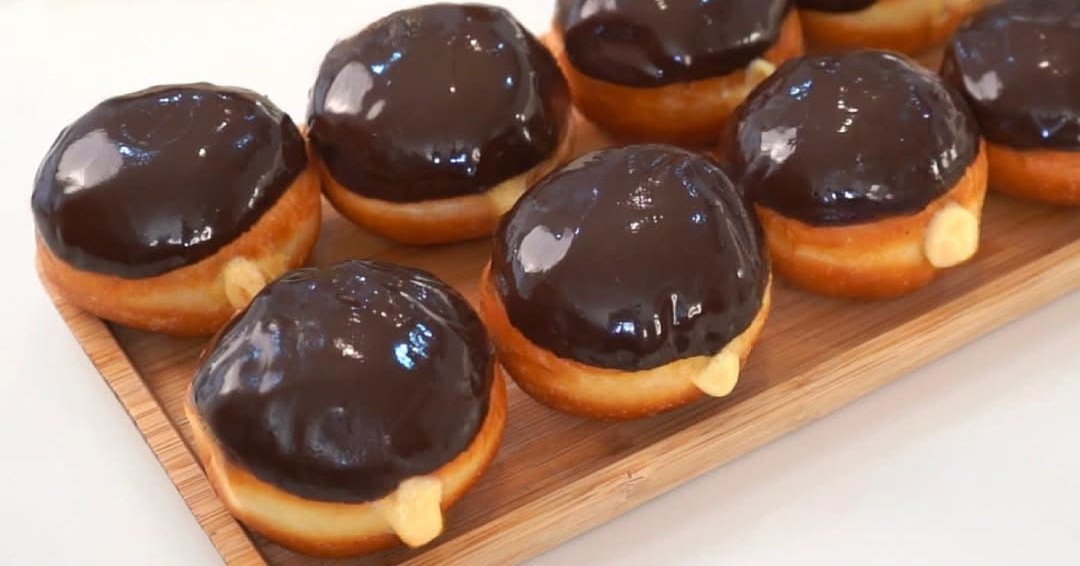
BOSTON CREAM DONUTS 
This homemade Boston Cream Donuts are so yummy and better than a store bought ones. Filled with vanilla custard and dip in rich chocolate to enjoy.
Here's what you'll need:
For the DOUGH:
1/3 cup milk (80ml)
2 eggs
2 tbsp sugar (30g)
1 tsp instant yeast (3g)
2 cups bread flour (250g) or 2 and 1/4 cup all purpose flour 
1/4 tsp nutmeg powder
1/2 tsp salt 
2 tbsp butter (30g)
For the Pastry Cream:
3 egg yolks
1/2 cup sugar (100g)
440ml milk (1 & ¾ cup)
2 tbsp flour (20g)
1/4 tsp salt (1g)
1 tsp vanilla (5ml)
2 tbsp butter (30g)
For the Chocolate Glaze:
1/2 cup semi sweet chocolate
1/2 cup cream
-Heat in a microwave in 20 seconds increment with stirring in between.
1. For the Dough: In a stand mixer bowl, mix together milk, eggs, sugar and instant yeast. Add bread flour, nutmeg powder and salt.
2. Place in a stand mixer and set at speed 2 for 3 minutes. When the dough pulls away from the sides of the bowl and becomes smooth, add 2 tbsp butter. Let it knead for another 3 minutes or until the dough is smooth. Form into a ball. Place in an oiled bowl and cover until doubled in size.
3. For the Pastry Cream: In a pan, mix together yolks and sugar. About 2 minutes. Add milk and flour and salt. Cook over medium low heat until thickens. Then turn off heat. Add vanilla and butter. Mix then scrape sides and bottom. Transfer to a bowl and cover with cling wrap. Set aside.
4. For the proofed dough, transfer to a floured counter. Divide into 8 equal portions. Roll and smooth into a ball. Cover for 30 minutes. Heat oil about 2 inches deep in frying pan over medium heat. Fry donuts 2 to 3 minutes on one side. Then flip and fry the other side for 1 minute. Let it cool down. Make a hole on each donut using a small knife as shown in the video.
5. Fill each donut with pastry cream. 
6. For Chocolate Glaze: Melt a semi sweet chocolate and cream. Dip each donut.

Twix Cheesecake

Details
Lorie Kennedy logo
Dessert Articles
Hits: 3509

Share on Social Media

Twix Cheesecake
Ingredients
Base:
  • 25.5 mini Twix fingers about 6.8 oz mini Twix bars
  • 300 g shortbread biscuits crushed (2 ½ cups shortbread cookies, crushed)
  • 80 g salted or unsalted butter melted (5 ½ tbsp salted or unsalted butter)
Cheesecake:
  • 250 ml double cream cold (1 cup heavy whipping cream, cold)
  • 500 g cream cheese room temp (2 cups cream cheese, softened)
  • 100 g thick ready-made caramel ⅓ cup thick store-bought caramel, such as Sainsbury’s Taste the Difference Salted Caramel or similar brand
  • 120 g icing sugar 1 cup powdered sugar/confectioners’ sugar
Topping:
  • 120 g thick ready-made caramel same as above (⅓ cup thick store-bought caramel)
  • 120 g milk chocolate broken into pieces (¾ cup milk chocolate chips or chopped milk chocolate)
  • 80 ml double cream ⅓ cup heavy whipping cream
Instructions
Step 1: Add the Twix Bars
  • Place an 8-inch circular piece of parchment/baking paper in the bottom of your tin.
  • Stand the mini Twix fingers vertically around the edge of the tin side-by-side, laying them gently against the edge of the tin. Be careful not to knock them as you're placing them down, as they may fall down like dominoes!
Step 2: Prepare the Cheesecake Base
  • Crush the shortbread biscuits into fine crumbs using a food processor or by placing them in a sealed bag and crushing them with a rolling pin.
  • Mix the biscuit crumbs with melted butter until the mixture resembles wet sand. Carefully scoop this into the middle of your tin, without knocking down the Twix fingers! Press the down base firmly ensuring an even layer, then place the tin in the fridge to chill while you prepare the filling.
Step 3: Create the Cheesecake Filling
  • In a large mixing bowl, whip the cold double cream until it holds stiff peaks. Set aside.
  • In another bowl, beat the cream cheese, icing sugar, and thick caramel together until smooth and creamy. Gently fold in the whipped cream, being careful not to overmix.
  • Spread the cheesecake filling over the chilled base, smoothing it out with a spatula.
Step 4: Make the Topping
  • Warm the thick caramel slightly in the microwave or over low heat until it’s smooth and pourable. Spread a thin layer of caramel over the top of the chilled cheesecake, smoothing it evenly.
  • In a microwave-safe bowl or jug (I prefer to use a Pyrex measuring jug), melt the milk chocolate and double cream together on a medium heat (500W) for 1 minute, stirring gently until smooth. It may need another 30 seconds in the microwave if it isn't hot enough. Let the ganache cool slightly before pouring it over the caramel layer.
Step 5: Chill the Cheesecake
  • Refrigerate for at least 6 hours, or preferably overnight, to allow it to set completely.
Step 6: Decorate and Serve
  • Carefully remove the cheesecake from the springform tin and transfer it to a serving plate.
  • Slice into 13 portions and serve chilled for the ultimate Twix-inspired dessert.

Carrot Cake and Frosting

Details
Lorie Kennedy logo
Dessert Articles
Hits: 3398

Share on Social Media

Carrot Cake and Frosting

  • 3 cups flour
  • 1 1/2 teaspoon baking powder
  • 3/4 teaspoon baking soda
  • 1 tablespoon cinnamon
  • 1 teaspoon freshly grated nutmeg
  • 1/2 tsp allspice (optional, see note below)
  • 1/2 tsp cloves (optional, see note below)
  • 3/4 teaspoon salt
  • 2 cups sugar
  • 1 1/2 cups vegetable oil
  • 4 eggs lightly beaten
  • 1 tablespoon vanilla extract
  • 2 cups grated carrots (coarsely grated)
Instructions
  1. Grease a 9x13 baking pan or coat it with baking spray. (or two 9 inch round cake pans)
  2. Sift together flour, baking powder, baking soda, cinnamon, salt, and other spices.
  3. In a large mixing bowl, whisk the sugar, eggs and vanilla and oil until light and fluffy.
  4. Stir in the grated carrots.
  5. Fold in the dry ingredients by hand.
  6. Stir only until the dry ingredients are incorporated into the batter. Do not over mix.
  7. Pour into prepared pans and bake for 40-45 minutes at 325 degrees F or until a wooden toothpick inserted into the center of the cake comes out clean.
  • The spices in this recipe are on the bolder side, as I wanted a well spiced cake. Any of these can be omitted or reduced to suit your own taste.
  • Use the large side of the grater, and only lightly pack the grated carrot to fill 2 cups. Finely grated carrot can introduce too much moisture into the cake.
  • Raisins/ and or nuts can be added to this recipe. About 3/4 cup of ether should suffice. I do toast and roughly chop all nuts with a chef knife before adding them. It really does improve their flavour.
  • Get the recipe for theWhipped Cheesecake Frosting HERE.
  • The cake can also be baked in two 9 inch round cake pans. Let the toothpick test be your guide to when it's fully baked, usually 30-35 minutes
 
  • FROSTING                                                                                                                                                          1 cup whipping cream
  • 1 cup icing sugar
  • 2 blocks cream cheese (1 pound total)
  • 2 tsp vanilla extract
Instructions
  1. Let the cream cheese warm up out of the fridge for an hour before using it. This helps keep the frosting smooth with no lumps.
  2. Take 3 tbsp icing sugar from the 1 cup you've measured.
  3. Add it to the bowl of an electric mixer, with the whisk attachment in place.
  4. Add the whipping cream and whisk at high speed until the cream makes soft peaks. Not too stiff.
  5. Remove the whipped cream to a separate small bowl and set aside.
  6. Return the bowl to the mixer, this time with the paddle attachment. (No need to wash the whisk yet, you will need it again)
  7. Add the cream cheese, vanilla extract and remaining icing sugar and beat until the mixture is soft and smooth. A sort of spreadable texture.
  8. Remove the paddle attachment and scrape down the paddle and sides if the bowl well. 
  9. Add the whisk attachment again and add about 1/3 of the whipped cream.
  10. Whisk at high speed until smooth.
  11. Add the next 1/3 of the cream and again whisk until smooth.
  12. Finally, add the last of the whipped cream and whip at high speed for 2 or three minutes until smooth and light.
  13. Frost your cake as desired.

Banana Bread Brownies

Details
Lorie Kennedy logo
Dessert Articles
Hits: 3512

Share on Social Media

Banana Bread Brownies

  • ¾ cup (3¾oz/105g) all-purpose flour
  • ½ teaspoon baking powder
  • ½ teaspoon salt
  • ½ cup (4oz/115g) butter, melted
  • 1 ½ cups (12oz/340g) granulated sugar
  • 3 large eggs, at room temperature
  • 2 teaspoons vanilla extract
  • ½ cup (2oz/57g) unsweetened cocoa powder
½ cup (3oz/85g) bittersweet chocolate, finely chopped
  • 2 large (10oz/284g) very ripe bananas, mashed
Instructions
  • Preheat the oven to 350°F (180°C) and butter and line with parchment an 8x8-inch (20x20cm) baking pan. Set aside.
  • In a medium mixing bowl, combine the flour, baking powder, and salt.
  • In a separate mixing bowl, whisk together the butter, sugar, eggs, and vanilla extract.
  • Combine the wet and dry ingredients and then divide the batter evenly into 2 separate bowls.
  • In one bowl, sift in the cocoa powder and stir in the chopped chocolate.
  • In the other bowl, stir in the mashed banana.
  • Dollop the brownie batter into the prepared pan, then pour over the banana batter.
  • Take a butter knife and swirl the chocolate batter through the banana batter without mixing it completely, to create a marbled look.
  • Bake for 40-45 minutes, until a wooden skewer inserted in the middle, comes out clean. Let cool completely before cutting into squares.
  • Store in an airtight container at room temperature for up to 3 days, or freeze for up to 2 months. Defrost at room temperature or in the microwave for a minute.
Banana Bread Brownies sliced into servings.

More Articles …

  1. Date & Walnut Slice
  2. Raspberry Marshmallow Slice
  3. No-Bake Pineapple Dream Dessert
  4. Millionaire Candy
Page 1 of 15
  • Start
  • Prev
  • 1
  • 2
  • 3
  • 4
  • 5
  • 6
  • 7
  • 8
  • 9
  • 10
  • Next
  • End

Privacy Policy
Acceptable Use Policy
Disclaimer

© Copyright 2009 - 2025 www.meetmeworld.net. All Rights Reserved.